
Imagine you’re in the middle of an important project, and you need to share a visual snippet of your screen with a colleague. Or perhaps you want to save a specific section of an article, capture a funny moment during a video call, or record an error message for tech support. Screenshots can be a lifesaver in many scenarios, and knowing how to take them efficiently can streamline your workflow.
Whether you’re a Mac newbie or a seasoned user looking to refine your skills, this guide is your one-stop shop for mastering screenshots on macOS.
How to Take a Screenshot on a Mac: Basic Screenshot Techniques for Screen Capture on Mac
Capture the Entire Screen
The simplest way to take a screenshot on your Mac is by capturing the entire screen. Here’s how:
- Shortcut: Shift + Command + 3
- What Happens: You’ll hear a camera shutter sound, indicating that the screenshot has been taken on your MacBook Pro.
- Where It Goes: Screenshots are saved by default to the mac desktop unless you customize this in settings to save screenshots elsewhere. By default, your screenshot is saved as a PNG file on your Desktop.
Example: Capture your entire desktop setup when you need to share your screen’s layout with a colleague for troubleshooting.
Additional Tips for capturing high-quality screenshots and screen recordings:
- For Retina displays (high-resolution screens on newer Macs), the resulting image will be large. To reduce file size, you can change the format to JPG in System Preferences > Screenshots.
- If you want to copy the screenshot to your clipboard instead of saving it as a file, use the shortcut Shift + Command + Control + 3. This is useful for quickly pasting into documents or image editors.
Capture a Specific Area (Capture portion of the screen)
Sometimes, you only need a part of the screen capture, especially with mac desktop settings. Here’s how to do it:
- Shortcut: Shift + Command + 4
How to Use: Your cursor will turn into a crosshair. Click and drag to select the area you want to capture, and a thumbnail of the screenshot will appear at the corner of your screen. Release the mouse button to take the screenshot.
Precision Tip: Hold down the Option key while dragging to constrain the selection to a horizontal or vertical line. This helps in making precise selections.
Example: Capture a specific recipe section from a website or a hilarious moment during a video call.
Advanced Techniques:
- After selecting an area, you can hold and drag the selection from the corners to resize it before finalizing the screenshot.
- Press and hold the Spacebar while dragging to move the entire selection area when taking a screenshot on a Mac.
- Use the Shift key to lock the aspect ratio while resizing your selection.
Capture a Window or Menu
Need to capture a specific window? Here’s the method:
- Shortcut: Shift + Command + 4, then press the Spacebar
- How to Use: Your cursor will turn into a camera. Hover over the window you want to capture and click to take the screenshot.
- What Happens: This captures only the active window, excluding other screen elements.
Example: Capture the contents of an active application window, such as a chat conversation or a browser tab, on your MacBook.
Pro Tips:
- This method also works for capturing dropdown menus and other UI elements that disappear when clicking elsewhere.
- To exclude the window’s shadow, hold down the Option key when you click to capture.
Advanced Screenshot Techniques
Use the Built-in Snipping Tool on Mac
For even more control, use the built-in Screenshot tool:
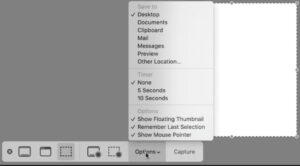
- Shortcut: Shift + Command + 5
- What It Does: Opens a toolbar at the bottom of your screen with options to capture the entire screen, a selected window, or a selected portion. You can also record your screen.
- Capture with Delay: Click on “Options” in the toolbar and choose a delay of 5 or 10 seconds. This is useful for capturing menus or pop-up windows that might disappear when you initiate a screenshot.
Example: Use the delay feature to capture a dropdown menu or a pop-up notification that otherwise disappears too quickly.
Additional Features:
- In the Options menu, you can choose to show or hide the mouse pointer in your screenshots.
- You can set a default save location for all your screenshots.
- Enable “Show Floating Thumbnail” to quickly access editing tools after taking a screenshot.
Customization Options
To further tailor your screenshot experience, head to the customization settings: adjust where your screenshots are saved or other macOS features.
- Path: System Preferences > Keyboard > Shortcuts > Screenshots
- Customization: You can change the default keyboard shortcuts for screenshots on a Mac to better fit your workflow.
In-depth Information:
Picture Formats:
- PNG: Lossless format, great for maintaining image quality but results in larger file sizes.
- JPEG: Compressed, with slight quality loss but smaller file size, ideal for sharing screenshots on mac.
- TIFF: High-quality, suitable for professional use where detail is paramount.
Application Preferences: Some applications may prefer specific formats, so choose accordingly.
Save Location: Change the default save location from the Desktop to any folder of your choice to save screenshots. For better organization, create a dedicated folder for screenshots within your chosen location, so that it can be easy to find screenshots later when required. For example, create a folder named “Screenshots” in your Documents folder to keep your Desktop clutter-free.
Thumbnail Popups: Enable or disable the small thumbnail that appears after taking a screenshot. This can be handy for quick edits or can be turned off for a cleaner workflow.
Advanced Customization:
Change the default screenshot file name format using Terminal. For example:
defaults write com.apple.screencapture name "MyScreenshot" && killall SystemUIServerThis command will prefix your screenshots with “MyScreenshot” instead of “Screenshot”.
Disable the shadow effect on window screenshots:
defaults write com.apple.screencapture disable-shadow -bool true && killall SystemUIServerThis command removes the shadow effect from window screenshots for a cleaner look.
Tips and Tricks for Power Users
Quick Edits:
- Use the Markup tool in the screenshot preview for quick annotations.
- Add text, shapes, or signatures without opening a separate app.
Timed Screenshots:
- Capture menus or other temporary UI elements using the delay feature.
- Set up your screen, then use Shift + Command + 5 and select “Options” to set a timer.
Clipboard Shortcuts:
- Use Command + Control + Shift + 3 to copy the whole screen to clipboard on your MacBook.
- Use Command + Control + Shift + 4 to copy a selected area to clipboard.
Capture Touch Bar (for compatible Macs):
- Use Command + Shift + 6 to capture the Touch Bar display.
Hide Desktop Icons:
Before taking a screenshot, hide desktop icons for a cleaner look to make editing the screenshot easier, especially when using mac keyboard shortcuts:
defaults write com.apple.finder CreateDesktop false; killall FinderReverse with:
defaults write com.apple.finder CreateDesktop true; killall FinderScreenshot Naming Conventions:
Develop a system for naming your screenshots for easy searching later.
Example: “ProjectName_PageName_YYYYMMDD.png” is a useful naming convention for screenshots on your mac using crosshairs.
Utilize Quick Look:
Press Spacebar while selecting a screenshot file to preview it instantly.
Batch Editing:
Select multiple screenshots and right-click to use the Markup tool on all at once, a useful feature in the screenshot app.
Accessibility Options and Alternative Methods
For users who might have difficulty with keyboard shortcuts, there are alternative methods:
- Trackpad: Press and hold Shift + Control + 4 to use the Trackpad for taking screenshots on mac.
- Voice Control: Enable in System Preferences > Accessibility > Voice Control to copy a screenshot easily. Use commands like “Take screenshot” or “Capture screen.”
- Zoom for Precision in screenshots on mac: Enable in System Preferences > Accessibility > Zoom. Use to magnify areas for more precise selections in screenshots on mac.
- Dwell: For users with motor impairments, enable “Dwell” in Accessibility settings to trigger screenshots by holding the cursor still over a specific area.
These accessibility features ensure that all users, regardless of their physical abilities, can effectively capture and share their screen content.
Practice Exercises
To help you master these techniques, try the following exercises:
- Capture your entire desktop, then use Markup to circle an important icon.
- Take a screenshot of a specific application window on macOS Mojave without its shadow.
- Use the timed screenshot feature to capture a dropdown menu.
- Practice using the Screenshot tool to record a 10-second video of your screen.
- Try combining shortcuts: capture a portion of the screen directly to your clipboard and paste it into a document.
File Management and Organization
Keeping your screenshots organized is crucial for productivity when using mac keyboard shortcuts to capture them. Here are some tips:
- Create a dedicated “Screenshots” folder in your Documents directory.
- Use descriptive names for your screenshots, including the date and context, to make them easier to find when using mac keyboard shortcuts.
- Regularly review and delete unnecessary screenshots to save space.
- Consider using tagging features in Finder to categorize screenshots by project or topic.
- Set up automated backups of your screenshot folder to ensure you don’t lose important captures.
Security and Privacy Considerations
When taking and sharing screenshots, keep these security tips in mind:
- Be mindful of sensitive information in your screen captures, such as passwords or personal data.
- Review screenshots before sharing to ensure no unintended information is visible.
- Use editing tools to blur or redact sensitive parts of screenshots when necessary.
- Be cautious when taking screenshots of confidential work documents or proprietary information.
- Consider using encrypted storage or transfer methods when sharing sensitive screenshots.
Troubleshooting Common Issues
If you encounter problems with screenshots, try these solutions:
Screenshots not saving:
- Ensure you have enough storage space.
- Verify permissions for the save location.
- Check if your chosen save location is available (e.g., external drive connected) to ensure screenshots are saved properly.
Blank or black screenshots:
- This can occur with some graphics cards. Try updating your macOS or graphics drivers.
- Restart your Mac to clear any temporary glitches.
Unable to capture a specific app:
- Some apps may prevent screenshots for security reasons (e.g., banking apps or streaming services).
- Try using screen recording instead, or capture the entire screen and crop later.
Blurry screenshots:
- Ensure you’re using a Retina display’s full resolution.
- Check your display settings on your MacBook Pro to confirm you’re using the highest available resolution for the best quality screenshots.
Screenshot shortcuts not working:
- Verify that the shortcuts haven’t been changed or conflicting with other app shortcuts.
- Reset the shortcuts to default in System Preferences > Keyboard > Shortcuts > Screenshots on macOS Mojave.
Third-Party Tools
While macOS offers robust screenshot capabilities, some users might need additional features. Here are some popular third-party tools and their key features:
Snagit:

- Advanced editing and annotation features
- Scrolling capture for long webpages
- Video recording with editing capabilities
Monosnap:
- Cloud storage integration
- Quick sharing options
- Simple editing tools to help you quickly edit the screenshot.
Lightshot:
- Easy upload and sharing of screenshots
- Simple interface for quick captures within the screenshot app.
- Cross-platform compatibility
CleanShot X:
- Customizable capture area with magnifier
- Built-in image editor
- Cloud uploading and sharing
When choosing a third-party tool for screenshots and screen recordings, consider factors like cost, additional features you need, and compatibility with your workflow.
Conclusion
Mastering screenshots on your Mac can significantly boost your productivity and communication. From basic captures to advanced techniques, this guide has equipped you with the knowledge to handle any screenshot scenario. Remember to practice regularly and explore the features that best suit your needs. As you become more proficient, you’ll find that taking and managing screenshots becomes an effortless part of your daily Mac usage.
Happy screenshotting!


